XMAMan.GraphicEngine
0.0.2
dotnet add package XMAMan.GraphicEngine --version 0.0.2
NuGet\Install-Package XMAMan.GraphicEngine -Version 0.0.2
<PackageReference Include="XMAMan.GraphicEngine" Version="0.0.2" />
<PackageVersion Include="XMAMan.GraphicEngine" Version="0.0.2" />
<PackageReference Include="XMAMan.GraphicEngine" />
paket add XMAMan.GraphicEngine --version 0.0.2
#r "nuget: XMAMan.GraphicEngine, 0.0.2"
#:package XMAMan.GraphicEngine@0.0.2
#addin nuget:?package=XMAMan.GraphicEngine&version=0.0.2
#tool nuget:?package=XMAMan.GraphicEngine&version=0.0.2
How to use the GraphicEngine
There is support for WinForm and WPF. Outputmethods are 2D, 3D and Raytracing.
You can find the source code for the examples, shown here, at this link: https://github.com/XMAMan/GraphicEngineExamples
Usage of the Raytracer
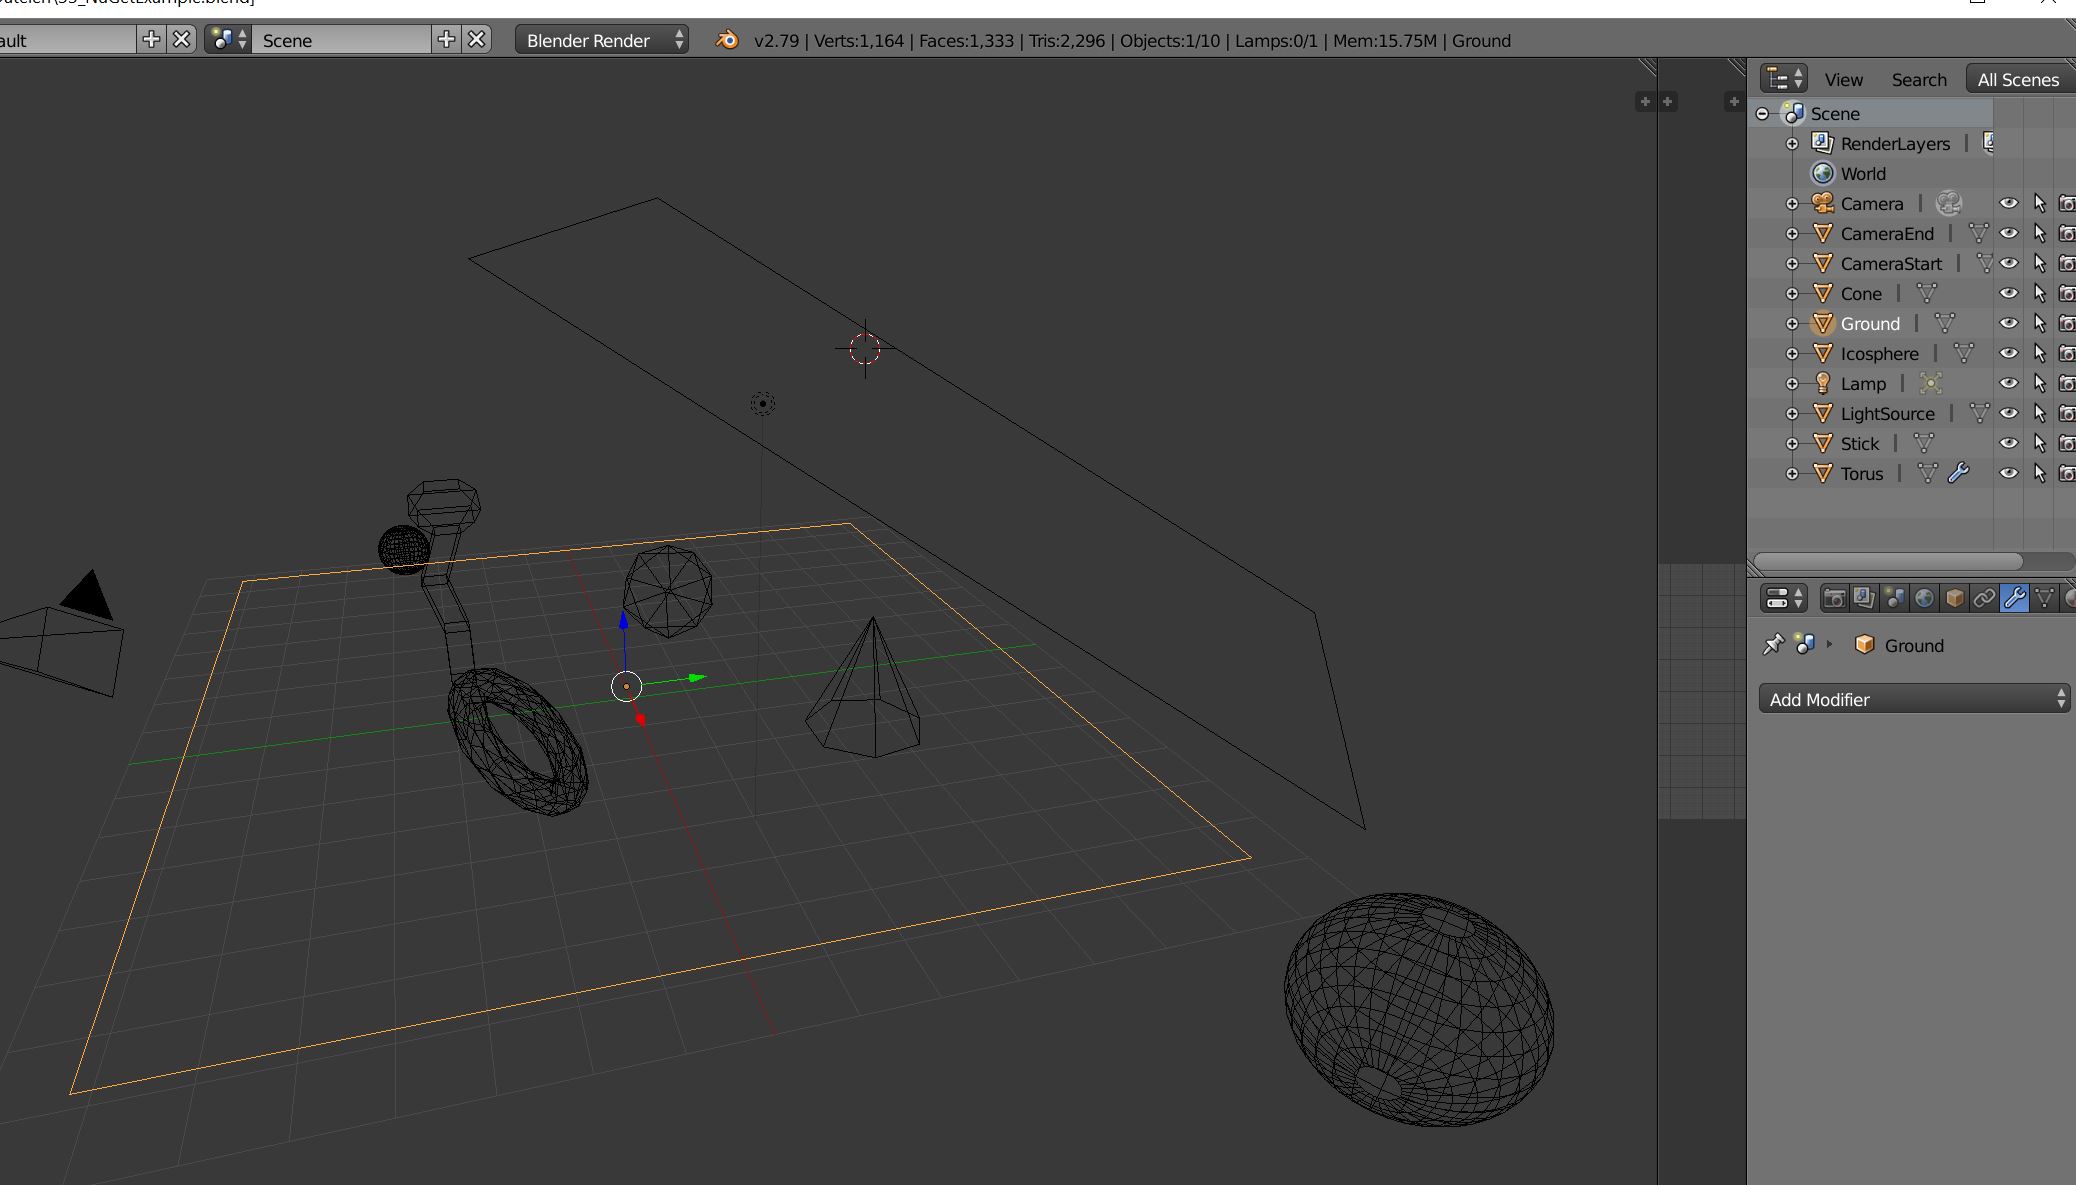
Step 1: Create your scene with blender
Use the Wavefront-Exporter and use the triangulate-checkbox for export.
Step 2: Create a WPF-Project
You need this in your csproj-File:
<UseWindowsForms>true</UseWindowsForms>
Add this to your xaml-File to place the GraphicPanel
<Border BorderThickness="5" BorderBrush="DarkBlue" x:Name="graphicControlBorder"/>
For you code-behind you need this
 var panel = new GraphicPanel3D() { Width = 100, Height = 100, Mode = Mode3D.OpenGL_Version_3_0 };
 this.graphicControlBorder.Child = new GraphicControl(panel);

 this.DataContext = new ViewModel(panel);
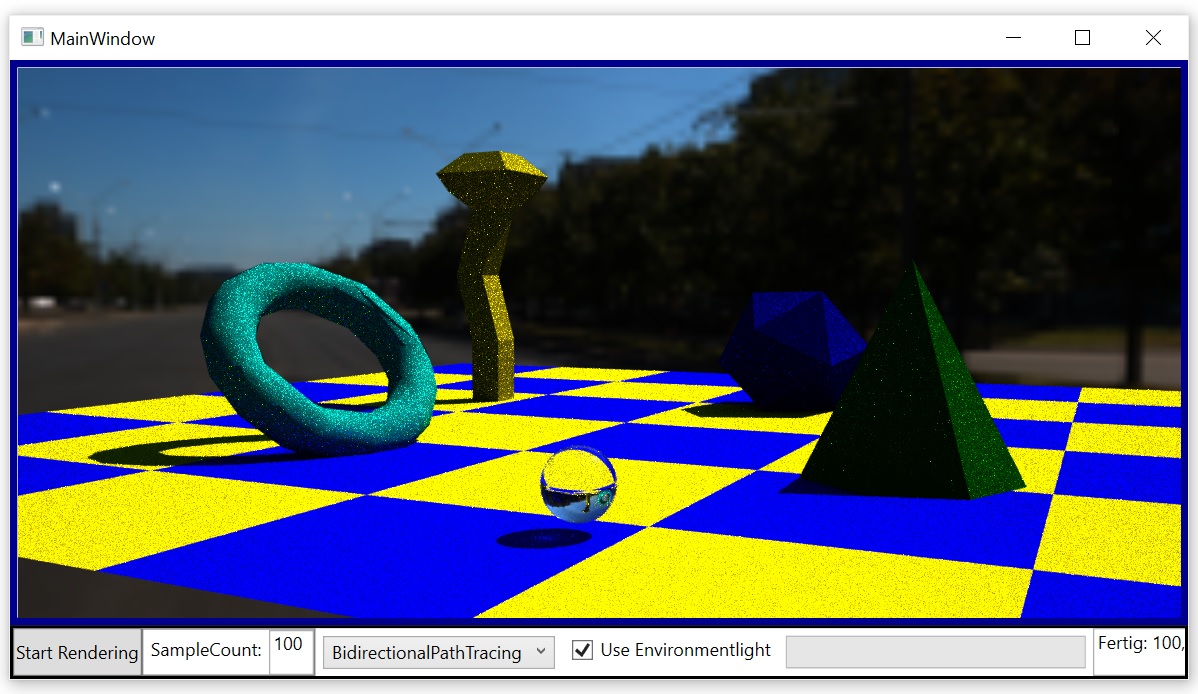
Now you can use the GraphicPanel3D-Object in your ViewModel to send the drawing-commands to the view. In our case we want to use the raytracer to show a blender-file. To do this we need to add at first the obj-file:
panel.RemoveAllObjekts();
panel.AddWaveFrontFileAndSplit(DataDirectory + "3DScene.obj", false, new ObjectPropertys()
{
    SpecularHighlightPowExponent = 20,
    NormalInterpolation = InterpolationMode.Flat,
    Albedo = 0.5f
});
After this we can start the raytracer asynchron with
this.panel.StartRaytracing(this.panel.Width, this.panel.Height, (result) => {}, (error) => {});
You can show/update the raytracingresult on the graphicpanel with this line of code:
graphicPanel.UpdateProgressImage();
This will produce this image.
See the Raytracer-Demo-project for details.
3D-Output via WPF
You start again like in the raytracer-project by creating a WPF-Project and add the GraphicPanel to the view and viewModel.
If you want to display a 3D-scene you load the data into the GraphicPanel one times with this method:
private void Add3DObjects()
{
    panel.RemoveAllObjekts();

    //Ground
    int groundId = panel.AddSquareXY(1, 1, 1, new ObjectPropertys()
    {
        Position = new Vector3D(0, 0, 0),
        Orientation = new Vector3D(-90, 0, 180),
        Size = 80,
        Color = new ColorFromTexture()
        {
            TextureFile = DataDirectory + "Decal.bmp",
            TextureMatrix = Matrix3x3.Scale(6, 6)
        },
        ShowFromTwoSides = true,
        BrdfModel = BrdfModel.Diffus,

    });

    //Use Parallax Mapping for the ground
    var tex = this.panel.GetObjectById(groundId).Color.As<ColorFromTexture>();
    this.panel.GetObjectById(groundId).NormalSource = new NormalFromParallax()
    {
        ParallaxMap = tex.TextureFile,
        TextureMatrix = tex.TextureMatrix,
        ConvertNormalMapFromColor = true,
        TexturHeightFactor = 0.04f,
        IsParallaxEdgeCutoffEnabled = true
    };


    //Player
    this.playerId = panel.AddCylinder(2, 1, 1, true, 10, new ObjectPropertys()
    {
        Position = new Vector3D(0, 2, 0),
        Orientation = new Vector3D(0, 0, 0),
        Color = new ColorFromRgb() { Rgb = new Vector3D(1, 0, 0) },
        BrdfModel = BrdfModel.DiffuseAndMirror,
        HasStencilShadow = true,
    });

    panel.AddRing(0.3f, 2, 5, 20, new ObjectPropertys()
    {
        Position = new Vector3D(0, 2, 0),
        Orientation = new Vector3D(0, 0, 45),
        Size = 1,
        HasStencilShadow = true,
        NormalInterpolation = InterpolationMode.Smooth,
        TextureFile = "#004400",
        SpecularHighlightPowExponent = 50,
        ShowFromTwoSides = false
    });

    //LightSource
    panel.AddSphere(0.1f, 10, 10, new ObjectPropertys()
    {
        Position = new Vector3D(0, 10, 3),
        Orientation = new Vector3D(0, 0, 45),
        Size = 1.0f,
        TextureFile = "#FFFFFF",
        ShowFromTwoSides = true,
        RasterizerLightSource = new RasterizerLightSourceDescription() { SpotDirection = Vector3D.Normalize(new Vector3D(0, 30, 0) - new Vector3D(0, 75, 30)), SpotCutoff = 180.0f, SpotExponent = 1, ConstantAttenuation = 1.1f },
        RaytracingLightSource = new DiffuseSphereLightDescription() { Emission = 2200}
    });

    panel.GlobalSettings.BackgroundImage = "#FFFFFF";
    panel.GlobalSettings.ShadowsForRasterizer = RasterizerShadowMode.Shadowmap;
    panel.GlobalSettings.Camera = new Camera(new Vector3D(0, 7, 10), new Vector3D(0, -0.5f, -1), 45.0f);
}
In the timer-tick-method you can now draw the 3D-Object and add also 2D-content at top:
private void Draw()
{
    this.panel.DrawWithoutFlip();
    this.panel.DrawString(10, 10, Color.Red, 15, "Press W,A,S,D for moving the cylinder");
    this.panel.DrawString(10, 30, Color.Red, 15, "Press 1,2,3 or 4 for switching mode. Current mode: " + this.panel.Mode);
    this.panel.FlipBuffer();
}
This will produce a 3D-scene where you can move the red cylinder:

See the Wpf3D-Project for details.
3D-Output via WinForm
Create a new WinForm-application in VisualStudio and add the GraphicEngine-NuGet. After this go the the toolbox and add the GraphicPanel3D-Panel to your MainWindow-Panel.
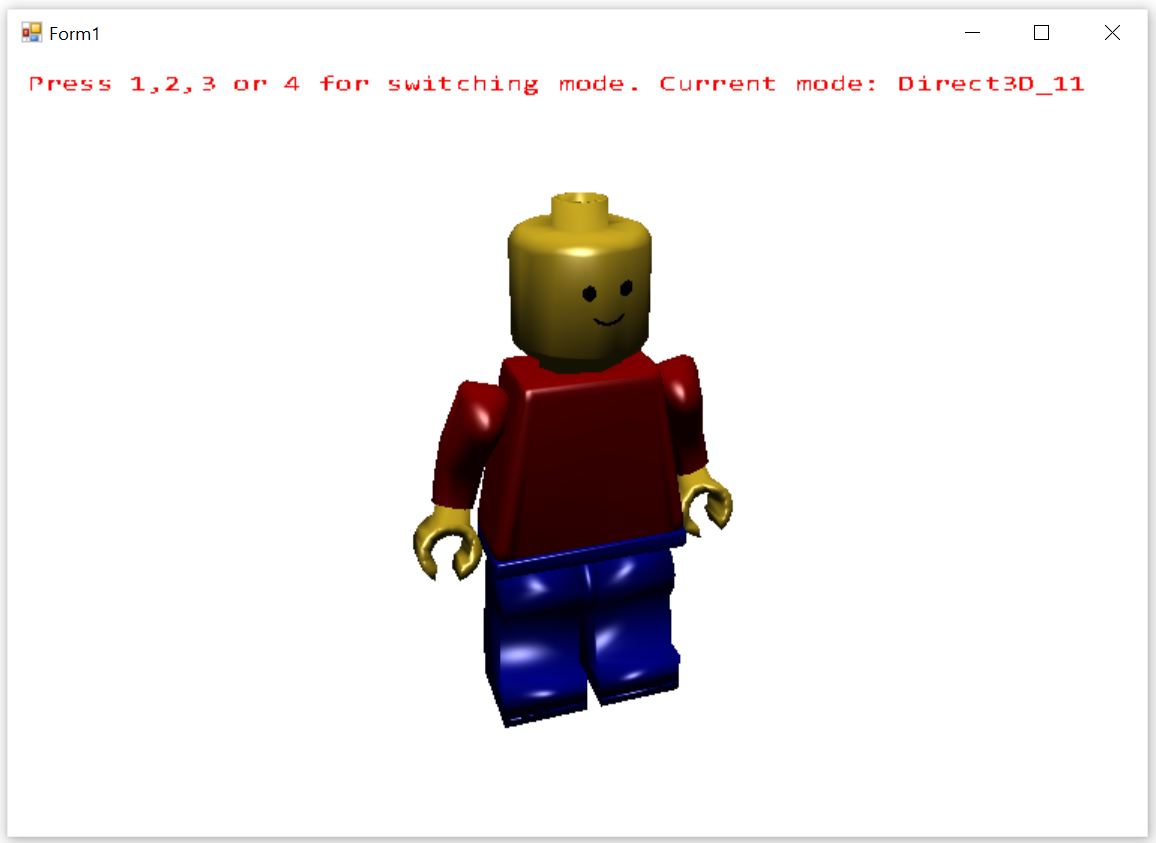
You can now again add all 3D-objects one time at start (or durring runtime if you would add/remove an object).
 panel.RemoveAllObjekts();
 //LegoMan from Wavefront file
 this.legoIds = panel.AddWaveFrontFileAndSplit(DataDirectory + "LegoMan.obj", false, new ObjectPropertys()
 {
     NormalInterpolation = InterpolationMode.Smooth,
     SpecularHighlightPowExponent = 50,
     Size = 0.1f,
 });
In the timer-tick-method you call again the DrawWithoutFlip- and FlipBuffer-Method.
private void Draw()
{
    this.panel.DrawWithoutFlip();
    this.panel.DrawString(10, 10, Color.Red, 15, "Press 1,2,3 or 4 for switching mode. Current mode: " + this.panel.Mode);
    this.panel.FlipBuffer();
}
This will produce a legoman which is spinning.
See the WinForm3D-Project for details.
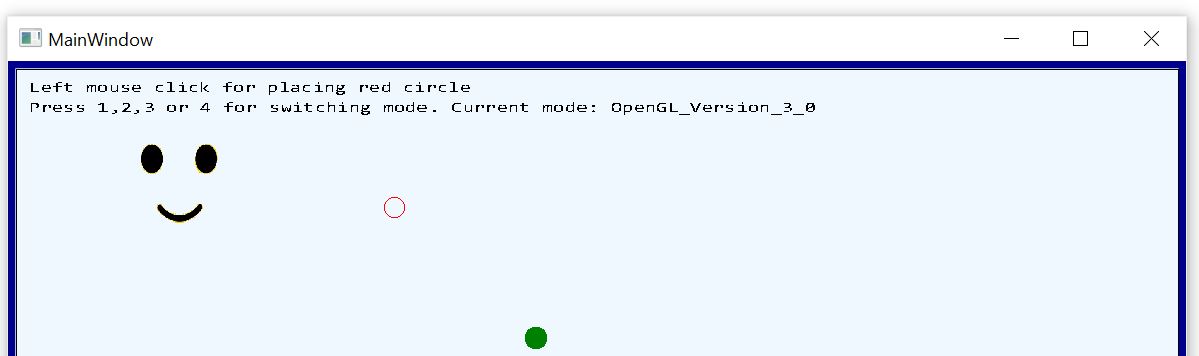
2D-Output via WinForm
You create a new WinForm- or WPF-Project and add the GraphicPanel like in the 3D-Examples. But instead of using the Add-Methods for adding some 3D-Objects you are using the draw-commands direct in the TimerTick-Method.
private void Draw()
{
    this.panel.ClearScreen(Color.AliceBlue);

    this.panel.DrawRectangle(new Pen(Color.Black, 2), 0, 0, this.panel.Width, this.panel.Height);

    this.panel.DrawFillCircle(Color.Green, this.ballPosition, ballRadius);
    this.panel.DrawCircle(Pens.Red, this.mousePosition, 10);

    this.panel.DrawFillRectangle(DataDirectory + "Face_04.png", 10, 10, 300, 200, true, Color.White);

    this.panel.DrawString(10, 10, Color.Black, 15, "Left mouse click for placing red circle");
    this.panel.DrawString(10, 30, Color.Black, 15, "Press 1,2,3 or 4 for switching mode. Current mode: " + this.panel.Mode);


    this.panel.FlipBuffer();
}
This will produce this image with a moving circle:
See the WinForm2D/Wpf2D-Project for details.
| Product | Versions Compatible and additional computed target framework versions. |
|---|---|
| .NET Framework | net is compatible. |
-
.NETFramework 4.6
- Newtonsoft.Json (>= 13.0.1)
-
.NETFramework 4.7
- Newtonsoft.Json (>= 13.0.1)
NuGet packages
This package is not used by any NuGet packages.
GitHub repositories
This package is not used by any popular GitHub repositories.
Bugfix in Wavefron-MaterialLoading